Wood Turning

Woodturning Projects & Tips | Carl Jacobson's Woodshop.TV

Lichtenberg Burning

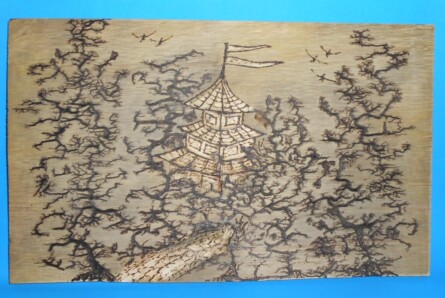
G’day Carl. I watched your videos on Conestago Lichtenberg Figure Burner and had Charles send me one to Australia and then purchased a 500watt converter. Well my first burn turned out OK but my second attempt I thought was good enough to send, I cut the pagoda and path back a bit with the dremel, I used half inch plywood. Cheers Bob Colllins

Second-Lichtenberg

Submitted by: Bob Collins

Rockler

Spiked Mobius Ribbon using a scrollsaw

G’day Carl, something different for you. Cut on the scrollbar using the Bowl from a Board method. There are 2 x half bowls and 10 x Quarter bowls using a 8 point star pattern then glued in sequence to form the Mobius Ribbon, I used 1/2 inch Marine plywood and dyed with a light mahogany color with a couple of coats of poly.

Spiked-Mobius-Ribbon

Submitted by: Bob Collins

UFO on Fire

Made this UFO shaped Candleholder out of cherry with a clear lacquer finish. Please enjoy!

David

Submitted by: David K

Rockler

10 inch Sycamore Bowl

Hi Carl,

A little while back I asked for advice about a Lathe. With your advice I got a larger capacity lathe and actually went with a Jet 16-40 lathe. Here is my first finished project. It is a 10 inch bowl, 5 inches deep finished with walnut oil and bees wax. Just in time to hand out candy… Thank you for your help. As promised I’d like to drop off a piece of Maple Burl or a Walnut blank I have been seasoning. Let me know if you want me to drop it off or send it to you. I’m in Newberg. Thanks again.

Rupert

IMG_1078

Submitted by: Rupert

DIY Lego Frankenstein

Did you know that LEGOs were once made out of wood? The inventor of LEGO, Ole Kirk Christiansen, was a carpenter from Denmark. The original toys were wooden, but switched to plastic in 1947. With this project, I make a LEGO-style Frankenstein figure out of wood.

lego-man
You might recall from the poisoned apple project that I had some trouble with the top cap. The second attempt looked more like LEGO hair than dripping poison. Of course, that meant I needed to build a LEGO figure to go underneath the hair, and since Halloween is approaching rapidly, Frankenstein seemed like a good choice.
lego-h
The head is a piece of maple. The turning is rather straightforward (a LEGO head is a rounded cylinder, more or less). I gave my Frankenstein a bit of a brow ridge and used the Lichtenberg burner to add a forehead scar. Other facial details were carved with chisels, and I dyed the wood with Transfast. Don’t forget the neck bolts!
lego-1
The body is mostly made from walnut. The body required very little work — just some angled cuts and sanding. The arms are maple. I turned the profile of the hands, did some offset turning to add the required angles, then drilled out the centers of the hands and used the oscillating spindle sander to open them up and clean up the edges.
lego-2
The legs are mostly bandsaw work. Once the profile is cut, you can use the oscillating spindle sander to clean it up.
lego-3
I joined the pieces with 5/8” dowels. The dowels are only glued on one side, so I can still move the arms and legs of the figure if I want to. This makes our Frankenstein posable to a certain extent (much like actual LEGO figures).
lego-5
This is another fun Halloween project that keeps to the spirit of the holiday but won’t make children cry. You can use this same basic principle to make any LEGO figure you want, though — it doesn’t have to be a halloween project.
Do you have more ideas for Halloween projects? Let me know in the comments. Thanks for watching!